
Home musicians often start their journey by learning how to play an acoustic instrument. When they’re ready to perform or take their skills to the next level, they purchase an amp to let their sounds be heard.
A “guitar amp” is simply one used for that instrument. Anything with the appropriate cording and connection would work with this equipment.
That’s why you’ll see everything from electric ukuleles to electric bass guitars plugged into a guitar amp.
You can also plug your microphone into a guitar amp to be heard. Although it is not the ideal option for vocals, this guide shows you how to maximize what you have for the best audio possible.
Why Would I Use an Amp with a Microphone?
Most musicians are starting from a shoestring budget. Before you can even think about broadcasting your voice through an amp, you’ve got a mic to purchase. Adding the additional expenses of a guitar amp, soundboard, wireless transmission, and more to create a meaningful audio experience coming at a price that’s out of reach for many.
Plugging a microphone into a guitar amp, you already own, is a way to save money while providing yourself with a performance foundation.
Several additional reasons are worth considering if you have a microphone, an amp, and no soundboard or audio station.
- It gives you a way to amplify your vocals so that they’re heard over the other instruments.
- You can play and sing at outside venues when an independent speaker system isn’t available.
- Most venues require you to provide instrument amps, which means you’re using this investment in ways that add value.
- You can practice with the mic at home for speeches, public speaking, or other performance formats.
If you must project sound through a microphone to be heard, something must be on the other end of the chord to offer that support. A guitar amp is an affordable way to accomplish this goal without the need for additional equipment.
What Does a Microphone Sound like through a Guitar Amp?
Most amplifiers are not meant to be used with vocal microphones. When you set up a sound system for almost any venue, wireless mics transmit to the audio mixing board to create an authentic, lightly compressed result that produces softer sounds.
If a venue uses a wired system, the microphones plug into the audio board directly to achieve the same result.
When you use an amp for your microphone, it’s a lot like using a megaphone for your voice. It gets louder to help your voice rise above the background noise, but this benefit comes at the cost of distortion.
Depending on the quality of the amplifier in question, vocals may not be understandable when using a microphone this way.
The problem with performance is due to the frequency range support provided by an amplifier. Human voices have a wide Hz range when speaking, singing, or even whispering! When you have a microphone plugged into a guitar amp, the full harmonic range doesn’t receive support.
Most guitar amps are mean to emphasize the mid-range and treble, losing the lower bass frequencies along the way.
That’s the same reason why a bass guitar uses a specific amplifier that focuses more on those lower audio frequencies.
Could a Microphone Break a Guitar Amp?
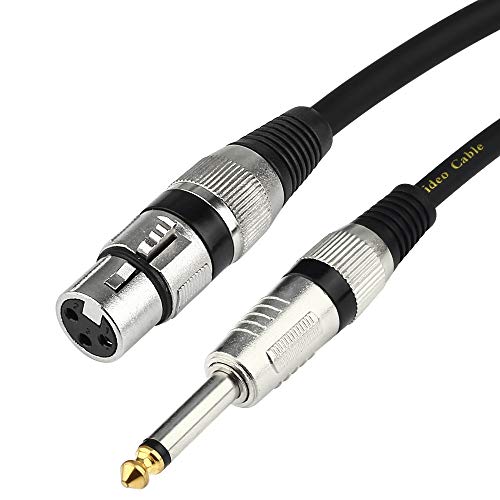
If you’re using an entry-level guitar amp, the only input option available is a 1/4-inch cable. Smaller models typically have one such support, creating a 1:1 ratio from the instrument to the amp.
Most cabled microphones use an XLR input to transmit vocals to an amp, sound station, or mixing board. Although a few high-end amplifiers offer this feature, it is not considered a standard option.
The only way to use a microphone with a guitar amp would be to connect a female XLR adapter to the 1/4-inch connection.
That structure creates another weak point for the sound signal, causing the audio waves to lose even more of their luster.
When using the appropriate adapter with your amp, most microphones should not cause damage unless they’re used in ways that fall outside of the manufacturer’s recommendation. Even if you get too close to the amplifier with the mic to create feedback, the chances of blowing it out are minimal.
Most guitar amps expect power and audio surges because of the modern playing style. As long as you remember to connect your microphone while the equipment is off, your risk factors will be virtually non-existent.
How to Plug a Microphone into a Guitar Amp
- XLR cables have a male and female end, indicating that they are different from each other. It would help if you had a female XLR connection, as the male version will not plug into the microphone.
- Connect the XLR end of the cable to your mic.
- With the amplifier turned off, connect the 1/4-inch jack to the appropriate input.
- Turn the amp on, keeping it at a low volume while performing sound checks. This step ensures that you reach an appropriate audio level for your equipment.
- Adjust your EQ settings if those options are available on your guitar amp.
It helps to have someone turn on the amp for you while you stand on the other side of the room. This process ensures that the level adjustments benefit everyone.
Standing in front of the amp while trying to improve your audio settings can lead to feedback issues.
Best Amps to Use for Vocals
When you use amplification for vocals, the system requires a woofer and a tweeter to support all frequencies. The average guitar amp doesn’t include that structure.
If your goal is to have something for practice, the sound quality expectations may not be high for the equipment. There’s no reason in that circumstance why an affordable, entry-level amp wouldn’t be useful.
If anything, try to buy a cheap amp for bass guitars to produce better results if your vocals are in the lower range.
When you’re playing a live gig or want a realistic practice performance, you’ll need to grab an amplifier that has a tweeter and a woofer for the best sounds.
You’ll also need to look at these three specs.
- Wattage. This figure represents how loud the amplifier can get when played at full volume. A bigger number also lets you know when the distortion will start, giving you more projection before the interference disrupts your sound.
- Size. When you have a guitar amp with an impressive wattage figure, the equipment will get more massive and have additional weight. This issue improves the sound quality even more, but it may require more than one person to transport it.
- Active/Passive. An active speaker has an individualized power supply, while passive ones require energy from a different source. Most units that work with microphones in this way are the former option.
You’ve got two options to consider if you want to feed your vocals through a guitar amp to get a practical result.
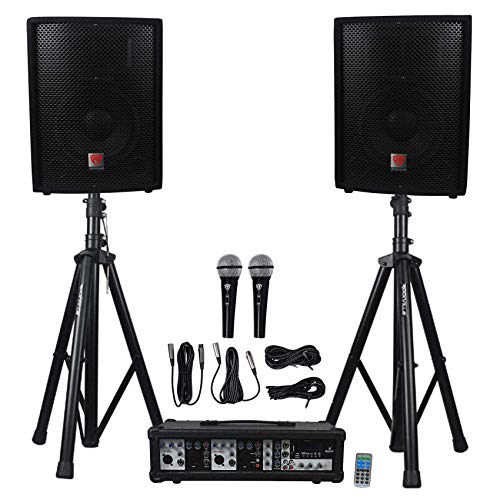
- 4-Channel Powered Mixer/Amp
- 10" Speakers
- Collapsible Stands
- 2 Mics
- 16 Ft. 1/4” TRS Right Angle Cables
■ A PA System Is Good for Live Gigs
Although a Public Address System may not seem like an excellent option for vocals, it gives you an amplifier for speaking, another for your instruments, and speakers to project the sound.
If you want to invest in a complete package, one that has a great guitar amp, a decent system that includes a microphone, two speakers with stands, an amplifier, and an audio station.
Then, the Rockville Package PA System is the best option for you, it lets you accomplish your goal without forcing the issue through an adapter.
Some models focus on portability, putting all of those features into a single speaker. Although this option is typically cheaper, you have a higher risk of experiencing distortion during operations.

- USB Type-C
- USB 2.0 Protocol
- 24-bit/192 kHz AD-DA converters
- 2 Preamps
- Phantom Power
- 2 Instrument and 2 Line Inputs
- 2 TRS Balanced 1/4" Line Outputs
- 1 Headphone Output
- Bus Powered
- Includes Pro Tools Like a 3-Month Splice Subscription
■ Audio Interfaces Work Well for Recordings
An audio interface like the Focusrite Scarlett 2i2 converts the sound signal from the microphone into a usable digital stream.
This data becomes savable on any computer or storage system, allowing for compression, enhancement, and tonal changes that add depth and character to each recording.
Most interfaces come with the needed XLR input. Plug the microphone into the system directly, attaching the audio interface to your operating system.
Once you launch the DAW software, you’ll be ready to convert your vocals into a digital signal that can get used in any recording.
How to Prevent Feedback from the Microphone
Microphone feedback occurs when a positive loop gain occurs between the signal and the amplifier or loudspeaker.
Once the unwanted sounds get transmitted into the audio signal, it gets amplified further until the audio broadcast occurs. The loop creates an overload that eventually produces that dreaded squealing noise.
There are virtually zero circumstances where you’d want to create this feedback loop with your microphone purposely.
Even when you connect it to a guitar amp, the gain differences between an instrument and a mic produce unwanted sounds.
Several triggers can cause the feedback loop to start with any setup. When you can identify the problem, it is much easier to implement a useful solution.
Here are some practical ways to eliminate microphone feedback from your setup or prevent it from appearing entirely.
| Microphone Feedback Issue | Possible Solution | |
| Positioning: | Feedback occurs when the microphone is too close to the guitar amp, loudspeaker, or similar broadcasting equipment. | Moving the microphone away from the equipment reduces the chance of a feedback loop developing. |
| Direction: | Microphones pointed directly at a guitar amp can trigger feedback when the cone gets overloaded. | Point the microphone away from the amplifier before initiating vocals during a performance. |
| Volume: | It is easier to overload your amplifier when the volume, gain, or both are at or near their maximum levels. This issue gets enhanced when microphones have similar settings. | During your sound check, slowly raise the gain and volume levels until you reach a vibrant tone with minimal distortion or feedback. Don’t try to rush this process. |
| Microphone Use: | When using the microphone, avoid cupping it with your hands. You alter how sound frequencies get interpreted, creating enough of a reflection to generate a feedback loop. | Instead of handling the microphone around the receiver, keep your hands along the casing near the cable to reduce feedback opportunities. |
| Environment: | Microphones can pick up background noises in most environments. Although the frequencies are quiet and non-disruptive under most circumstances, they can turn into feedback when amplified. | Try to limit environmental noise pollution while using a microphone plugged into a guitar amp. You could close the door, add foam panels to the walls, or work in a soundproof room. |
| Equalization: | Feedback occurs when the other sounds in the environment either match or are close to the frequencies produced by the vocals. | If you have audio mixing equipment, EQ the room by equalizing the entire system. You can use graphic, parametric, or automatic feedback reducers to gain a resolution. |
| Isolation: | Microphones turn vibrations into a sound signal that the guitar amp must try to reconcile. This outcome often turns into feedback because it’s an enhancement of the vocals being sent through the cable(s) for broadcast. | Removing the microphone from the floor to avoid vibration solves this problem. A stand is an affordable solution. Upgrading to a live-purpose mic will let you use internal shock-mounted cartridges. You can also use a shock-mount clip. |
| Monitoring: | Instead of using a foldback monitor or a loudspeaker to hear the audio coming from your microphone using the guitar amp, use an in-ear monitor. | Removing the additional audio sources from the stage reduces the overall noise. This step improves the gain and volume levels found at the microphone to minimize feedback risks. |
Step-By-Step Guide for Plugging a Microphone into a Guitar Amp
When you need to plug your microphone into a guitar amp, these steps will help you to do so safely.

- Dynamic Microphone
- Polar Pattern: Cardioid
- Frequency Response: 40Hz-15kHz
- Output Impedance: 150 ohms
- Connector: XLR
- Dimensions: 6.34" x 1.68"
- Weight: 0.63 lbs
1. Choose Your Microphone
Everyone has a preference for using specific mics. Once you find a great brand, it’s challenging to step away from the equipment you know.
When you want to use a microphone with your guitar amp, the best options are dynamic mics. This choice allows you to connect the input or place the unit in front of the amplifier to add more character to your instruments.
Several excellent options are available right now that won’t break your budget.
2. Move the Microphone
If you give your microphone an inch, you’ll gain a mile of usage with your guitar amp. Dialing into a good sound fast can be challenging, especially when the goal is to project your sound using an adapted cable.
The best option is to give your vocals a double mic. Place the second one in front of the amplifier to develop more authenticity with your sound.
When you move the second microphone closer to the amplifier’s speaker, a noticeable increase in bass frequencies happens. As you move farther away, fewer bass tones project through the system.
Moving the second microphone closer or farther from the edge creates fewer treble and mid-range frequencies.
When the sound has massive interference or harsh upper mid-range frequencies, try tilting the microphone to be at a 45-degree angle.
If you’re not sure where the speaker is within the amp, you can use a smartphone flashlight to detect the cone’s edge.
- XLR Female to 1/4 TS Mono Jack Microphone Cable
- Unbalanced Microphone Cable Mic Cord
- Perfect for Dynamic Microphones
- Multiple Layers of Shielding to Minimize Signal Interference
- 25 FT (8 Meters)
3. Choose Your XLR Connector
Most people will choose a direct connection to the amp using a wired microphone. That means the correct XLR connector must get used to transfer sound from the mic to the amp.
You have two options available at this step.
A product like the Tisino XLRF to 1/4-inch Adapter works with a cable of any length. You’d plug the end of the cord into the adapter, which then works with the amplifier input.
This option is suitable for those who like to wander the stage because it offers a firm connection without interfering with cable placement.
The other option is to get an XLR to 1/4-inch cable. You’d plug the one end into your microphone, while the other connects to the guitar amp.
You could even use an XLRF-to-1/4-inch tip/ring/sleeve to get the connection you need, even if the amp isn’t designed for such a product.
Since microphones use mono-balanced audio, as long as the tip and sleeves connect, you shouldn’t experience any abnormal audio issues.
4. Provide the Power Source
Once you have the microphone connected to your amp, you need the signal to transfer from one to the other.
When using a passive microphone, an external power source is not usually necessary. The moving-coil dynamics or ribbon dynamics found in the equipment take care of the work on your behalf.
When you have an active microphone, external power is necessary. Anything listed as a condenser, and some ribbon mics, fall into this category.
Three options are available to consider.
- Phantom Power. This method creates a “block” similar to what you’d see on a laptop power cord. It has an input and output to manage, which doubles your cabling responsibilities for the connection.
- DC Power. Most microphones in this category use the lavalier design that gets power from a wireless transmitter. You’ll need to set up the system first, adapt the output to connect to the amp, and then test your mic to ensure everything is routed correctly.
- External Power. This option is the standard choice because it is the easiest to use. Once you plug the microphone into a compatible power source (battery, outlet, etc.), you can connect it to the amp to project sound appropriately.
Although the XLR connection provides a balanced resource for microphones, the TRS cable isn’t typically designed to carry phantom power. It’s rarely used for microphones, so proceed with caution if this setup is the one you must use.
5. Finalize Your Gain Settings
Most microphone outputs don’t match the expectations of the amplifier input. Instruments have stronger signals than most mics with the bass or guitar pickup signal, which means you need additional gain to get the vocals to the same volume.
This issue is where feedback typically occurs. Most amps expect instrument levels, not microphone levels, and users turn up the volume to compensate.
Even if you don’t get feedback from this result, the distortion heard interferes with the audio quality significantly.
You can avoid dealing with feedback by keeping the amp gain below threshold levels while distancing the equipment from the cabinet.
Pointing the microphone away from the cabinet is also helpful.
6. Connect the Mic to Special Effects
Did you know that microphones create audio that can route through your different guitar pedals and effects? This step happens before the connection to the amp.
Most pedals for guitars (including bass guitars) use a 0.25-inch tip-sleeve jack to facilitate the connection. It’s similar to what you encounter when using a microphone with a guitar amp directly.
The steps for connecting the microphone to the pedals is the same as it is for the amp. It would be best to have the XLR to 1/4-inch adapter, then your standard cabling from the case to the amplifier.
Best Guitar Amps to Use with Microphones
Any guitar amp is potentially useful when you want to use a microphone with the equipment. If you want the vocals present without consideration of quality, anything in the under $100 price range is a suitable investment for your needs.
When quality is a factor to manage, these guitar amps are the best ones to use with your microphones.
- Type: Tube, Handwired.
- Number of Channels: 2
- Output Wattage: 40W
- Speaker Size: 2 x 12"
- Preamp Tubes: 2 x 12AX7, 2 x 12AY7
- Power Tubes: 2 x 6L6 Power tubes, 2 x 5AR4 Rectifiers.
- EQ: Bass, Treble
- Inputs: 2 x 1/4" (bright), 2 x 1/4" (normal)
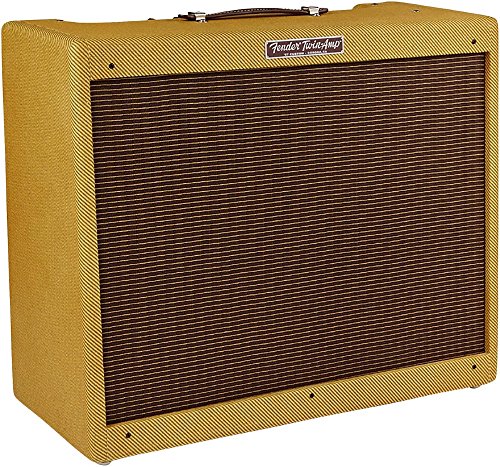
1- Fender ’57 Custom Twin 40W Tube Guitar Amp
This hard-wired guitar amplifier generates clear tones. When you use it with an instrument, you’ll notice a bit of hair with the output, creating nuance and character with each note.
If you’re using it with vocals, a surprisingly authentic sound comes out to enjoy.

The reason why this is possible is due to the 5E8A circuit the amp uses, powered with three pre-amp tubes that provide a wide range of frequencies.

- Type: Tube
- Number of Channels: 2
- Power Output: 50W
- Speaker Size: 1 x 12"
- Preamp Tubes: 4 x ECC83/12AX7, 2 x ECC81/12AT7
- Power Tubes: 2 x EL34
- Reverb: Yes
- EQ: 3-band
- Inputs: 1 x 1/4"
2- Orange Amplifiers Rockerverb
With a maximum 50W performance using a tube or solid-state designs, the dual power-tube system produces an excellent vocal performance.
It features an attenuation knob impedance and selectable output power options to stay in control of the volume and headroom while working.
You’ll find it is a workhorse, ready to manage your most extended gigs without altering your vocal tones’ crispness.

- 20-Watt All Tube Head
- 2 Channels
- 2 x EL84 Power Tubes
- 3 x 12AX7 Preamp Tubes
- JBE Voicing Switch for a Higher Gain More Saturated Sound
- Clean Channel: Single Volume Knob with Bright Switch
- Dirty Gain, Master, Treble, Middle, and Bass
- Global Presence Knob
- XLR Cab Simulated Output with Ground Lift, Axis and Level Switches. You Can Record Without Having Your Speaker Connected
- 8 and 16 Ohm Impedance Selector
3- Friedman Pink Taco
This model is smaller and more affordable than the famous BE-100 from Friedman, but the tones it produces are comparable.
You receive a small, compact, and lightweight guitar amp that is perfect for your vocals.
You’ll get more emphasis in the lower frequencies through the 20W design, managed by the EL84-powered single-channel setup that creates numerous sounds through the comprehensive EQ controls.

- Number of Channels: 1
- Total Power/Type: 60-Watts
- Speaker/Size: 2 x 10" Supro CR10 Speakers
- Preamp Tubes: 4 x 12AX7, 1 x 12AT7
- Power Tubes: 2 x 5881/6L6
- Effects: Reverb, Tremolo
- EQ: 2-Band
- Inputs: 1 x 1/4"
- Outputs: 1 x 1/4"
4- Supro 1650 RT Royal Reverb
This guitar amplifier is one of the few in existence that makes your vocals sound better than an instrument.
It uses an all-tube reverb with a switchable Class A to Class AB design to produce the audio quality you want. Independent treble and bass controls let you take control of the midrange.
You can work with pedals if you want, delivering crisp sounds that ring true under a variety of conditions and venues.
If you’re tired of thin sounds through your mic, this amp can solve that problem immediately.

- 60W Acoustic Combo Amp
- 8" Twin-Cone Speaker
- 2 Channels, 2 Inputs
- 3- & 2-Band EQ, “Colour” Control
- 4 Digital Effect Presets (3 Reverb, Chorus)
- 12 mm Birch Plywood Cabinet
- Includes Padded Gig Bag
- Weight: 14.3 lb. (6.5 kg)
5- AER Tommy Emmanuel Signature Compact Combo Amp
With twin cone speakers and dual-channel individual tone stacks, this amp‘s versatility stands out when using it with a microphone.
Instead of managing pedals, you can take advantage of the chorus, parallel, delay, and reverb techniques with your primary connection.
The EQ curve it adds for your vocals produces a natural, full sound without feeling like automatic filters over-compressed the audio waves.
It’s lightweight, small for easy transportation, and the case has extra padding to protect your investment.
- Type: Solid State
- Output: 10 Watts
- Speakers: 6" Special Design 4 Ohm Speaker
- Channels: Single-Channel /w Overdrive Button
- Weight: 8.5 lbs. (3.8 kg)
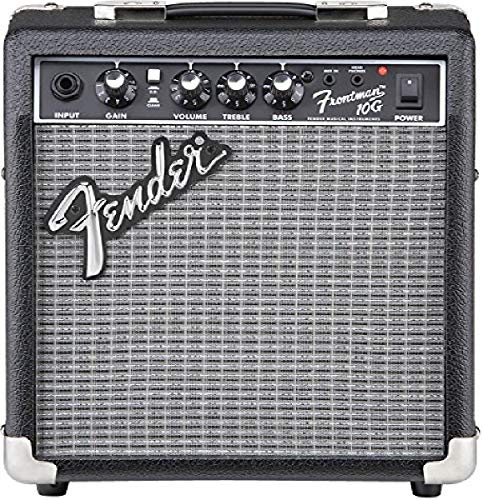
6- Fender Frontman 10G Guitar Amp
This model is the only entry-level amp that produces a reasonably good vocal output.
Although it is typically sold in a kit with two dozen picks and a 10-foot cable (1/4-inch to 1/4-inch), the value in the treble, bass, and gain controls are worth noting.
Distortion is kept to a minimum with its unique design, and you have an AUX input and headphone output jacks to use.
The closed-back construction keeps vibration and feedback to a minimum. A press of a button lets you shift from clean to overdrive if you do want more distortion.
A Final Thought on Plugging a Microphone into a Guitar Amp
Once you’ve secured the equipment, plugged the microphone to the amp, and started working on the gain through these steps, it is essential to remember the amplifier’s frequency response.
Most guitar and bass cabinets don’t produce sound across the entire human hearing spectrum.
When you listen to music on your favorite speakers, the range is typically from 20 Hz to 20 kHz. The average amplifier only goes to 6 kHz, eliminating much of the upper mid-range and treble from the vocals.
Even if you use a bass amplifier for your microphone, the low-end cut-off is around 40 Hz.
Since microphones typically replicate the full range of human hearing, the amplifier won’t authentically reproduce the signal – no matter how good your equipment setup is with this method.
Plugging a microphone into a guitar amp has its applications, but it is not the best choice for most performances.
You can reduce issues by investing in premium microphones and amplifiers to project sound, but even the best systems won’t be as good as a full mixing board.