
When you start learning how to play the piano, the 88 keys you have to learn can seem overwhelming. How do you know what ones to play?
If you have trouble remembering which key corresponds to each note on your keyboard, one of the best learning strategies is to label the keys. Even if you only use one octave for this purpose, it’s a little easier to start learning the different chords and finger placement strategies.
Although some teachers don’t approve of this idea, learning how to play the piano or keyboard involves methodologies that reflect your needs. You might not want to use a permanent marker on a grand piano, but it is possible to get temporary designations to help you learn.
Some keyboards come with lighted keys that show you what the note is when depressing it.
Should You Label Your Piano Keyboard?
Since memorization skills are an essential component of learning how to play the piano or keyboard, labeling the keys is one way to make the process easier for some students. It’s often better to use this technique with young children, although some adults also benefit from this effort.
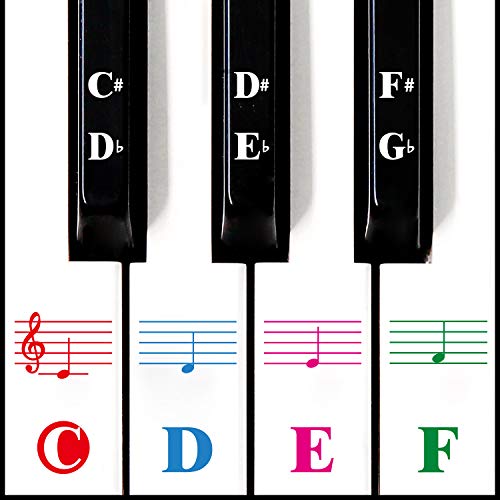
It’s usually better to work with color-coded keys when learning how to play the piano. This labeling option helps new musicians learn the various notes because some keys have multiple designations.
When you read sheet music, the flats and sharps correspond to the dark keys on the piano. If you have a D-sharp listed to play, that note is the same as the E-flat on the keyboard.
It would help if you still remembered the note and name, but the different hues make it easier to recall the information while building memory skills
Although some people remember the scales better by getting the notes in sequence from the middle C (C-D-E-F-G-A-B), the chords end up being a little tricker.
When you can color-coordinate those needs while also creating ways to remember the individual note names, the learning process advances exponentially.
The Basics of Learning How to Play the Piano
The first step of learning how to play the piano is to learn how to find the keys you want to label.
That’s why we need to get to know the musical alphabet on the instrument first. We use the same letters for notes that we do for the words we spell.
Although there are two clefs for notation, they all follow the A through G system. Only the first seven letters are used, and the “natural” notes are all on the white keys.
When you look at a piano or keyboard, you’ll see groupings of two and three darker keys. They alternate across the instrument, always following the same sequence.
It’s easier to use the darker keys to find the correct notes for the white keys on the piano.
Look for the first grouping of two darker keys. Next, place your finger on the white key to the left of the first black key in the sequence of two (it’s the key on the left in the grouping). That white key is the “C” note.
You’ll find numerous C notes on a piano. Each one is given a number based on its octave placement. The first one is called C1, the next is C2, and continuing on until you run out of space on the keyboard.
Every C note is in the same location, to the left of the first darker key in a two-key grouping.
The next note is a D. It’s the white key that sits between the two darker keys in the first grouping. As you go up the scale, you’ll get to E, F, and G.
After the G note, the scale resets to an A. This note is a little tricky to find at first by itself, which is why it is sometimes easier to locate the B.
You can find the B note on the right-hand side of the dark three-key sequence on the piano. Once you have it located, move back one white key to locate the A.
■ Understanding Sharps and Flats on the Piano
After you’ve memorized the sequence, you can start learning the sharps and flats designated by the black keys. These notes are a semitone (half a note) higher or lower than the “natural” note played.
That means an F-sharp will play higher, but a B-flat would play lower.
The darker keys represent two potential notes. If you find the C note, move to the dark key to its right. That note could be notated as a C-sharp or a D-flat. You would play it for either one.
Although you’d play the same key for those two notes, they have a different musical meaning when performing a composition. In practice, you’ll find that the note that requires the fewest signs is the one used to simplify reading the sheet music.
That means you might see D-flat used more often than C-sharp to reduce the number of accidentals used in the piece.
Why Does a Piano or Full-Size Keyboard Have 88 Keys?
Before we had the piano as a musical instrument, most composers were creating music for a harpsichord.
The harpsichord has 60 keys, which means a five-octave range was possible. Although those qualities were better than nothing, they often limited the creativity of musicians before the 18th century.
Bartolomeo Cristofori receives created for inventing the first piano around the year 1700. His goal was to update the harpsichord, but he ended up developing a new hammering mechanism to produce sounds. It was initially called an “arpicimbalo.”
That term eventually shifted to “gravicembalo col piano” after a journalist heard the instrument play, which translates to “harpsichord with quiet and loud.” That turned into “pianoforte,” and we eventually shortened the name.
The first piano only had four octaves. When Mozart and Haydn wanted to produce more complex compositions, instrument manufacturers expanded the size to accommodate their wishes.
Until the late 1880s, you could get pianos with different keyboard layouts like you can buy with an electronic keyboard today.
That’s when Steinway produced the first standard 88-key design. It became popular enough that the other manufacturers started using the same template.
When you play on an 88-key instrument, you’ll get seven octaves and three lower notes below the C1.
In total, there are 52 white and 36 dark keys to learn how to play. The design stays consistent because these notes are the ones that most humans hear consistently.
Although the 88-key design is standard, that doesn’t mean everyone follows the rules. Stuart and Sons produced a 108-key piano in 2018 with nine octaves.
Bosendorfer offers a 97-key piano, with the additional keys a different color to distinguish them from the standard layout.
The extra bass strings add more harmonic resonance to some compositions. This manufacturer also provides a 92-key option.
What Are the Best Ways to Label a Piano Keyboard?
Whether you have a piano or a keyboard, learning how to play the instrument requires you to remember what each key represents. Since you’ll play numerous chords with multiple finger placements, memorizing the 88-key format is necessary to have a successful experience.
Many electronic keyboards don’t have the full 88-key spread, but you will still follow the octave rules. Instead of starting at C1, you might have one that begins at C2. You might end at C6 instead of C7.
If you decide that labeling the keys is how you want to start learning how to play the instrument, you’ll find that five methods are available to create a successful result.
Each choice has different advantages and disadvantages to consider, so you’ll want to review each one carefully before deciding on how you want to proceed.
1. Color Coding
For many people, color coding the piano keys is the easiest way to learn how to play the instrument.
It works well because even young children who don’t know the alphabet can associate different notes to finger placement with this method.
Some older learners pick up the piano by ear more than they do through sheet music, which helps them start their journey with the instrument.
Color coding encourages memorization, making it easier to understand the different chords to play with a full hand spread. You also have the advantage of not physically writing the note letters on each key.
Here are the items you’ll need to learn how to play the piano with color coding.

- Self-Adhesive Sticker Dots. You’ll want to purchase a roll or sheet that contains at least five different colors, but it is better if there are six. Assign each note to a specific hue so that you can start to understand the basic scales. If you only have five options, label the C, D, E, F, and G notes since they are the five on the standard C-major scale.
You can use whatever five (or more) colors you prefer when using this labeling option. If you have six colors, label the B note and leave the A blank.
2. Write the Notes
You can label every note on the piano by writing each one on the keys. This choice makes it easy to find everything you need while playing, but it takes more time to complete.
Since it’s such a straightforward approach, the primary issue to consider is where you’ll place the stickers. If you put them where your fingers impact the keys, the ink from your writing could rub off on your fingers.
It usually works better to start with the middle C and move forward or backward from there. On the darker keys, it helps to label both notes that could be represented in the music.
Here are the items you’ll need to learn how to play the piano when writing each note.
- Self-Adhesive White Sticker Dots. You’ll want to purchase a roll of white dot stickers so that you can place removable labels on your keys. If these aren’t available, you could cut some name tag stickers to size, use Post-It notes, or anything else that affixes to the instrument safely.
- Writing Utensils. You can use pencils, pens, permanent markers, or other tools to write the notes on the sticker dots.
3. Notes and Notations
If you don’t want to write out the note names on stickers, you can purchase a product that provides this outcome for you. The only requirement is that you’ll need to know where the notes are on the piano so that you place the product on each key successfully.
If you choose the MAYA piano keyboard stickers, you’ll receive a product that is 20% larger than similar items. They’re also much thinner, which means you barely notice them when playing.
The manufacturer prints them so that the ink is underneath the top layer, allowing for clear visuals that won’t fade or transfer. If you place them in the wrong location, you can move them quickly without worrying about leaving behind any residue.

- For 49/61/ 76/88 Key Keyboards
- Transparent
- Removable
- Made in the USA
When you don’t want to put labels on each key, the QMG Piano Stickers are an excellent choice to consider. They’re transparent, designed to be on the upper portion of the keys so that your fingers aren’t touching them.
You’ll see what notes the darker keys represent because the label places the name next to it. The product also comes with a user guide and simple instructions to follow so that you can start playing in minutes.
Since these stickers can tear easily, you’ll want to be careful when opening the packets and placing them on each key.
It’s often helpful to label each note on every octave first, which means you’d start with all the Cs. You could then move to the Ds, the Es, and so on.
4. Starting Positions
It is sometimes easier to label the piano or keyboard with the starting position for each chord instead of putting names to all the notes.
Many beginners find that once they get the reminder of where to begin, the rest of the piece is easy enough to play.
Since you only need to put one sticker on the piano in most instances (on the middle C), you can use almost any self-adhesive product to create the results you want. Some people even use Scotch tape without naming the note for this purpose.
If you play a specific song that requires finger placement strategies for both hands, you might consider having labels on the notes where your pinky and thumb must start.
5. Problem Notes
When you have trouble remembering specific notes on the piano or keyboard, it helps to label them so that you can continue playing.
If you must stop to think about what note or chord to play in the middle of a composition, it can cause delays in your timing and tempo. When you’re playing with others, that means the entire band can get thrown off the beat.
You can use the colored or white stickers to identify the notes you don’t always remember when playing. It’s up to you to determine if writing the name is helpful in this situation.
One of the best ways to use this strategy is to label all the C notes with their octave number. This option makes it easier to transition to sheet music because your mind will already be in the process of identifying where to play and what scale to use.
As you get used to playing and where each note is located, you can start taking off the stickers until there aren’t any left on the instrument.
Best Keyboard for Beginners to Play
The cheapest way to start learning how to play the piano or keyboard is to get an old-fashioned upright grand built in the early 1900s. These instruments are heavy, but they’re also durable. It’s often cheaper to tune one or make a couple of repairs than it is to purchase a new instrument.
Many of these pianos are listed for free because of how challenging they are to move.
When you want to learn how to play on something more modern, here are the best keyboards to consider having at home today.

1. Donner DEP-20
This 88-key keyboard is fully weighted so that it feels like you’re playing a real piano. It comes with 238 different tones to use, providing different voices and instruments to diversify how you play with others.
There is even a dual mode where voices can combine, allowing the Donner DEP-20 to play the piano and drums together – or whatever else your imagination desires.
Instead of using a portable pedal, you’ll find the standard three-foot design on this keyboard to make it feel like an authentic playing experience.
It comes with an LCD screen to show you chord names, a recording mode, MIDI compatibility, and 25-watt amps for a richer sound.
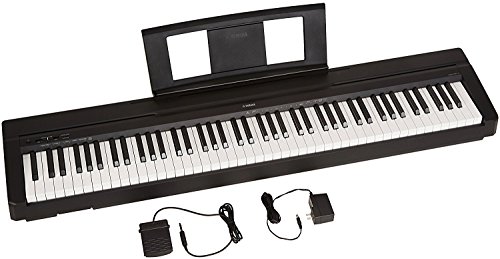
2. Yamaha P71
When you purchase this 88-key keyboard to use at home, you’ll receive one of the closest playing experiences to the real thing that exists today.
Even with that benefit, the slim profile for this instrument means you can take it almost anywhere. It only weighs 25 pounds, and the depth is less than 12 inches.
The Yamaha P71 only provides ten different voices, but some of the samples come from acoustic grand pianos built by the brand.
You can combine two voices, such as the piano with the strings, for more depth in your music. Most settings are changed with a single button, making it the perfect investment for young players, beginners, or experts.

3. Roland JUNO-DS
If you need a keyboard that is ready for the stage, you’ll want to take the Roland JUNO-DS to your next gig. This 88-key instrument delivers professional sounds, enhanced features, and a battery-powered design that maximizes your versatility.
The keys feel like the traditional ivory when playing, providing the right amount of heft without compromising how it plays.
The JUNO-DS comes with the brand’s updated sound package, including new organs and electric panels.
It offers sample import functions with WAV files, expansion slots for new waveforms, and eight phrasing pads that let you trigger audio songs or samples from USB memory.
All these benefits come at a price considerably less than what you’d pay for a modern grand piano.

4. Yamaha MX49
This electric keyboard serves as a production synthesizer so that you can produce up to eight elements within a single voice.
The features include zonal tones, layering, switches, cycling, and randomization to create unique sounds for your next composition.
You also receive 128 notes of polyphony so that you can have a dropout-free performance, even when you’re playing live.
The Yamaha MX49 provides class-compliant MIDI and USB audio for plug-and-play connectivity.
Instead of worrying about drivers or downloads, you can record and playback your stereo audio with 16 channels of MIDI data on a single USB cable.
It plays consistently, offers a beautiful tone, and is an essential instrument for anyone who does at-home recording.

5. Roland F-140R
When you invest in the Roland F-140R electric piano, you’ll receive an 88-key console that delivers one of the smoothest playing experiences found today.
Its design allows users to connect a mobile device through Bluetooth for a wireless remote or the inclusion of learning games so that you don’t need to label your keys.
The sensing technology maximizes the tonal potential of your playing style while offering a consistent sound engine.
Over 300 different tones are available on the Roland F-140R, including strings, guitars, brass, and synths. The natural piano offers the authentic tone from a real acoustic grand.
Even if you only need something for practicing, the 3D ambiance effect sent through to your headphones lets you practice authentically while keeping the environment quiet for everyone else.
Should you label your piano keyboard? You’ll earn different opinions from people on both sides of this question.
If you feel that it can help you learn how to play this instrument, it’s a method worth considering.