
At some point, almost all guitars develop a bit of a bow to the neck. Depending on the weight, playing style, and storage conditions the instrument faces, it can shift upward or backward.
When this issue occurs, the easiest way to fix the guitar is to adjust the truss rod. Although it can make some musicians nervous about working on this part of the instrument, a couple of tweaks is usually enough to get things straightened out once again.
You can sight the guitar along the neck to see its current condition by looking down the fingerboard. Check for low spots, uneven frets, humps, and other problems to see the current state of the instrument.
Don’t Be Nervous about Adjusting Your Truss Rod!
You can tighten the truss rod if you need to straighten a guitar that has developed an up-bow at the neck. When a back-bow occurs, you’ll need to loosen the nut instead. Mark the starting point on the hardware to see how far it gets turned. It might be helpful to remove it entirely to lubricate the threads.
The easiest way to sight your guitar is to hold the instrument by the neck. Allow the body to have support from the floor, a soft chair, or any other place that won’t create a higher damage risk. Close one eye as you look down the neck’s length to see if you spot any problematic areas.
A simple marker notation is all you need to give yourself a reference for the truss rod nut. Some guitars don’t let you take this hardware off to clean and lubricate it. Filing the solder away doesn’t make much sense since you could alter the tone or sustain from the strings.
If you don’t have a removable adjusting nut, always start by loosening it first to ensure you know how smooth the turn will be. It’ll give you a better feel for the eventual adjustment.
You’re also less likely to over-tighten your truss rod nut if you back things off before getting everything tight. Although it is uncommon, your guitar could already have the nut at the end of its threads. If you encounter that situation, it might be better to take your instrument to a trusted luthier or repair shop.
■ What Happens after I Get the Nut Removed?
If your guitar comes with a truss rod nut you can remove, you’ll want to prepare the threads for the upcoming repair. You can follow these steps to build the foundation for a successful experience.
- You’ll need to use a scribe or a small brush with sturdy bristles to remove built-up debris from the different parts and threads. It is usually easier to start at the bottom of the post before working your way up to the connection point with the instrument.
- When you have everything cleaned appropriately, it helps to add a little lubricant to ensure the nut can spin back into place without resistance. Petroleum jelly is helpful in a pinch, but it usually works better to use Guitar Grease. If neither is an option, you can smash a No. 2 pencil through the threads to use the graphite powder.
- Do not get any grease on the exposed wood.
- Start the work of reinstalling the nut. Use your original alignment marks to restore the hardware to its original position.
- As you tighten the bolt, look with your neck sighting to see if the instrument is getting straighter. If not, try loosening the nut. If neither option works, you’ll want to contact a local repair shop for assistance.
- Be careful when loosening or tightening the nut. Most are adjustable with an Allen wrench, but you can strip out the head if it slips enough. This problem creates an expensive repair.
What Is Your Relief Preference for Your Guitar?
When you talk about the relief that a guitar offers in this circumstance, it is when there is an intentional up-bow to the neck. This effort creates more lift to the strings than they would have if you had the adjustments perfectly straight.
Having a little relief is helpful when you play hard while wanting to have lower string action. For everyone else, getting the neck as straight as possible is the best setup for the instrument.
Even if you want a little relief at the top, it’s usually better to start with a straight neck when determining the final adjustments. If your truss rod works as it should, you can probably finish the setting by turning 1/8 inch in either direction to get the right feel.
You’ll notice that a little adjustment goes a long way when correcting a bowing problem. If you measure your string height with an action gauge before and after this work, you’ll see how much changes with tiny movements.
Once you have the relief settings where you want them, it helps to tune the guitar to pitch. Hold the instrument in its natural playing position instead of lying on its back. You can use a precision straightedge to see if the neck is straight.
If it rises with some relief, continue making small turns to tighten the neck until the straightedge is lying as flat as possible. The frets are sometimes uneven, making it tough to get a reading with this tool. A notched design that sits over the frets makes it easier to read the wood.
When you don’t have a straightedge at all, some string or thread can serve as a viable substitute.
When your guitar has a back-bow to the neck, loosen the nut until your straightedge starts lying flat. The guitar might have some uneven or loose frets that you’ll notice when taking this step.
After you make the truss rod adjustment, try to give your guitar some time to adapt to the new settings. It might take a few hours before you can tell if the neck is where you want it to be.
If you sight your neck and it still seems off, you can repeat the adjustment steps to get everything where you want it to be.
Once you get things sorted, your guitar will be playing with that sweet sound you have always remembered.
How Do I Know If My Truss Rod Is the Problem?
When something happens to a guitar, the blame almost always starts with the truss rod. It’s the scapegoat because the repair is simple – and often needs one tool.
Almost every guitar experiences a problem with the truss rod as the seasons change. When humidity levels climb or decrease, the natural components in the instrument will expand or shrink.
Some musicians blame the truss rod for everything from a faulty tuner to weak tone production.
If you think your guitar might have this problem, the only way to check is to play each fret on every string with the instrument unplugged. If the fret fails to sound a note or you can detect buzzing, those symptoms are evidence that your neck bowed upward to the strings. That’s when you’ll want to loosen the truss rod.
The truss rod nut never needs a complete turn. It usually doesn’t even need a half turn.
An improper adjustment could damage your neck, making the guitar unplayable until a professional repair occurs.
When your neck bows away from the strings, you’ll notice that more distance exists between the contact points. The instrument won’t start buzzing or fail to deliver on the frets.
The best place to check to see if you have a truss rod problem is on the seventh and twelfth frets. In severe cases, you might even discover the bend develop in the profile without sighting the instrument.
Although other specialists might say that the truss rod adjustment can fix other problems, the only thing that gets repaired is a bowing incident. Most musicians need to make this adjustment about twice per year.
You don’t want to use the truss rod adjustment to manage the action your guitar gets unless there is no other option. A bridge adjustment is more reliable for that purpose.
Why Does a Guitar Neck Start Bowing?
When you put steel strings on a guitar, that adds about 70 pounds of pressure to the instrument’s neck. Without any support, the torque would snap it in two. That’s why the truss rod exists.
It delivers the counterforce that you need against the string tension used for playing.
Different weather conditions can also cause the neck to start warping. That’s why it helps to store the guitar in a case with humidity controls. If you can provide a consistent environment, the results will add more consistency to the playing experience.
In rare circumstances, a neck can bow when the instrument isn’t stored correctly. If you lean it up against the wall, this result could happen on an extremely dry or humid day.
That’s when a high-quality guitar stand can help you manage the instrument’s condition. Here are some of the best options to consider using today if your hardcase isn’t available.

1. Zither Wooden Guitar Stand
This beautiful guitar stand comes in several different wood types to protect your instrument. Unlike the competitors that use MDF, particleboard, or laminate, it’s handcrafted with premium solid wood.
You’ll receive a furniture-quality piece with this investment. Although a bit of assembly is required, the only thing you’ll need is a Philips head screwdriver.
The Zither Wooden Guitar Stand comes with a hand-rubbed oil finish that hardens inside the wood for more durability. It offers a String Swing cradle, unique grain patterns, and a sturdy foundation. It is beautiful, arrives as advertised, and you can use it in any room in your home.

2. PRS Floating Guitar Stand
Your guitar will look like it’s suspended in the air with the design of this unique stand. It uses a padded hook that allows the instrument to rest at the bottom of its headstock.
The design is too bulky to take on the road, but it would work well at home or in a studio environment. The foam has enough padding to serve its purpose without causing an adverse impact where it sits.
When you install the PRS Floating Guitar Stand, your instrument will stand out in its storage area. It turns everything into a work of art, especially since you must take a closer look to see the headstock hold with the design.
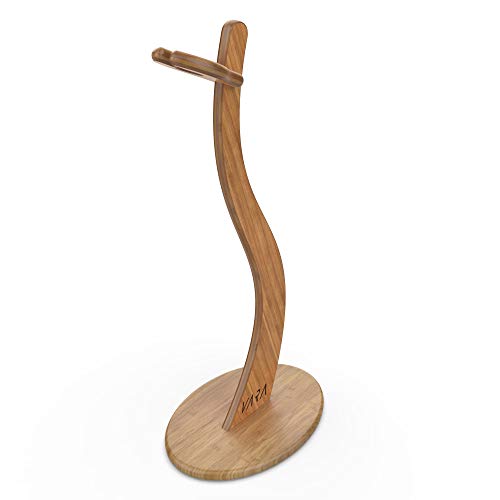
3. VARA Wood Guitar Stand
If you select this handcrafted guitar stand for your instrument, you’ll get a beautiful product made from bamboo that works well for acoustics, electrics, and more.
It requires assembly at home, but it only takes a couple of minutes to complete the work. You’ll get 39 inches of clearance from the mount to the base with a nesting design that protects against floor damage.
The VARA Wood Guitar Stand comes with anti-slip and anti-scratch pads to ensure that your instrument stays protected. It supports virtually any guitar weight with this design. You can place it in a corner, allow it to stand out as a centerpiece, or keep it within reach when playing a gig.
Should I Be Messing with My Truss Rod Adjustments?
I’ll be the first to admit that I was nervous at first when making my first truss rod adjustment. My circumstances were a little unique. The closest repair shop was over an hour away, they required an appointment one month in advance, and I had to play that weekend.
Since I didn’t have any choice, I made the truss rod adjustment myself. That’s when I learned that smaller turns are better!
Thankfully, I didn’t cause any damage to my guitar. I played the gig with my friends, hung out with the fans after, and it turned to be one of our group’s best concerts.
When you take these steps to preserve your guitar, the care and caution must extend to your storage. If you don’t have a hardshell case, grab one of these stands to help your instrument rest correctly.