
Amplifiers create sound because electricity runs through the equipment to power the speakers.
That energy impacts the materials included in the unit’s design, generating wear and tear that eventually causes the amp to wear out.
Some amplifiers need more attention than others to stay in good repair. Vacuum tubes often stop working after a few years, requiring a replacement to have the amp function.
Some electronic components can stop functioning because of broken circuits or other trauma-related incidents. These items would also require replacement.
When you know how to tell if your amp is losing power, it is easier to determine when a replacement or repair is necessary to continue playing.
Do Amplifiers Lose Power Over Time?
Amplifiers lose power over time based on how they are treated. The change is typically gradual, so most users don’t notice the difference until the capacitors receive a refresh. Since the sound quality remains relatively consistent, most units get 20 to 30 years of life before an update is necessary.
Amps provide power to your speakers. If something is wrong, you’ll hear a difference in the sound quality or tone – assuming that you can hear anything at all.
Since amplifiers are designed to function for a long time, they shouldn’t start having degradation problems in 12 to 24 months.
Although it is essential to check all the wiring and speakers when purchasing a new one, the units should function without hesitation.
If you’re concerned that your amp is losing power, here are the signs and symptoms you’ll see when this issue occurs.
- The lower end of the audio spectrum has extra popping, crackling, or buzzing compared to when you first started using the amp.
- When you turn up the volume, the sound quality has significantly more issues with tone replication than when it is quiet.
- You can hear the speakers cutting out when trying to play.
- Noticeable distortion is present in the audio that wasn’t there before AND the sound settings haven’t been adjusted to create this effect.
- The tone and quality of your instrument or recording doesn’t sound like they did when the amplifier was new.
When the amplifier starts losing power, it cannot deliver the same energy levels to the speakers.
Since some units use 300 watts or more, especially when a subwoofer is involved, the lower end typically starts showing symptoms first.
If you suspect the wiring in the amp is causing problems, a direct replacement is usually a straightforward DIY project. Just remember to unplug the unit before disconnecting the faulty components.
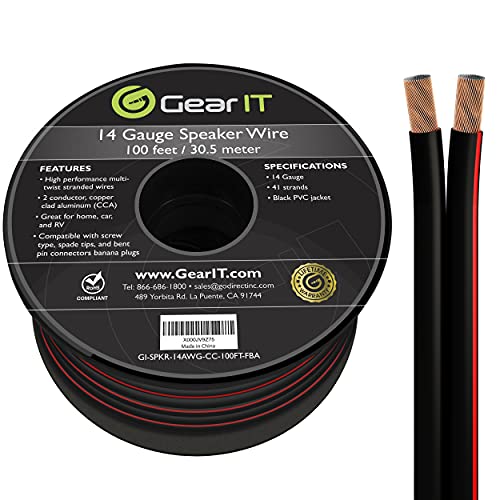
Most amps use 14-gauge speaker wire to deliver energy to the speakers. I highly recommend using Gear IT 14AWG Pro Series cable to finish this repair.
When you buy a spool, you can manage the needs of everything from a home theater system to your car speakers after getting your amp running again.
The Capacitors Tend to Be the First to Go
An amp’s capacitors tend to be the first to wear out because their job is to store a small charge. Comparing them to batteries that power other electronic devices would be fair. They release electricity when needed, avoiding the small surges that would burn out a product if their presence wasn’t there.
Since capacitors are always charging and discharging, they tend to wear out faster than the other components on an amp.
You have to use them, which means the equipment eventually wears out when playing consistently.
It’s equally bad not to use your amplifier. The oxide inside the amp’s capacitors renews itself when electrical currents pass through it. If you don’t supply energy, it’ll eventually break down and become unusable.
Replacing a capacitor is relatively straightforward. You need to take the old one off, replace it with a new one, and solder it into place.
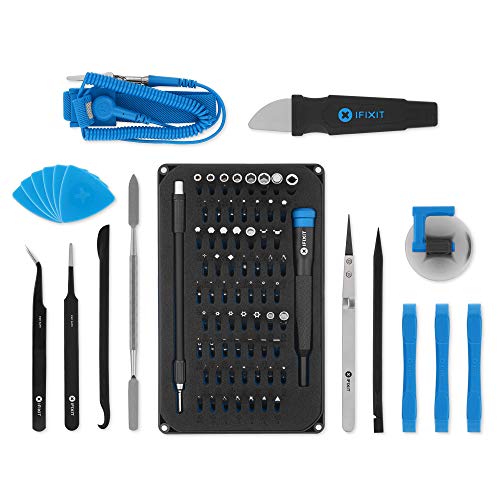
I use the iFixit Pro Tech Toolkit whenever I need to replace a capacitor. It has everything I need to get my amp up and running again – or any other electronic device that stops working.
To ensure the capacitor stays put, I use the YIHUA 60W Soldering Iron Station Kit. I like that it has a digital display that shows the tool’s temperature so that I don’t overheat the solder while working.
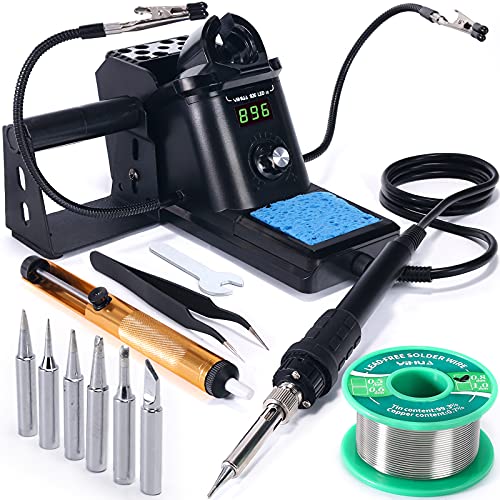
It comes with calibration support, conversions from Celsius to Fahrenheit, and enough solder to fix a few amps that need the capacitors replaced.
Steps to Follow to Repair an Amplifier That Lost Power Over Time
You should not work on equipment if you are not familiar with the tools or components necessary to complete a repair.
Suppose you don’t have previous experience working with electronics. In that case, it is better to hire an electrician or work with a musical equipment shop with a repair division to ensure your investment continues functioning.
Always ask for a quote before agreeing to the completion of any services. If the repair cost is more than what it would be to purchase a new amp, it’s better to upgrade.
Please remember to recycle the electronics as required by your local rules and regulations.
If you’re ready to begin the repair process, here are the steps to take so that you can have a successful experience.
When you’re working on electronic devices, the quality of the work directly reflects the outcomes received. This content is for informational purposes only and should not be treated as a recommendation.
- Ensure that the amplifier is unplugged from all power sources. It should not even be connected to battery power.
- Disassemble the amp by unscrewing all the outer screws and connectors.
- Use a can of compressed air to remove all the dust from the electronics and speakers thoroughly.
- Review all the internal wiring to ensure you have solid connections at both points. If you see something that could be disconnected, repair them before proceeding to the next step.
- Remove any blown capacitors or vacuum tubes. When a capacitor experiences a severe malfunction, it typically bulges. You can sometimes see corrosion at the connection points. You’ll need to press the heated soldering iron tip to the join on the back of the circuit board that holds the capacitor in place. Hold onto the part with your other hand, waiting until you feel the tip of the iron fall before pulling it away.
- Replace the old ones with compatible replacement parts. If you don’t use identical capacitors, the amp could blow out its circuits the moment you restore power to the unit. When you place the new capacitor, the leads should be in the same holes with the correct polarity. As soon as the tip falls through, press the wire lead through, remove the iron, and the old solder joint should solidify around the new part. Add more solder if necessary.
- After you’ve replaced all the old capacitors that stopped working, you’ll need to reassemble the amplifier to test it. If it starts working again with improved sound, you’ve done a great job!
You can typically see a blown capacitor without any special tools. You might see severed leads or leaking brown fluid coming from the one that stopped working correctly.
The top of some blown capacitors will bend outwards slightly, especially at the top, to create a convex shape.
That means it won’t look like it’s indented inward or lying flat. When you can spot those symptoms, you know that the item requires replacement.
Some solders require a commercial iron to melt. If you’re using a cheap hobbyist soldering iron, upgrading to the YIHUA 60W Soldering Iron Station Kit should help.
If you cannot locate a capacitor that isn’t working, you’ll need to test each one with a multimeter.
Tube Amplifiers Should Not Be Left On
When your amplifier uses semiconductors to distribute energy and produce sound, it can help to leave the unit on when you’re finished playing. That way, you’ve got the equipment warmed up and ready to go when you’re ready to play again.
If you have an amp that uses vacuum tubes, leaving the equipment powered can cause it to wear out prematurely. You’ll see significant reductions in power quickly.
Uncontrolled power through the vacuum tubes can cause them to heat up significantly, increasing the risk that they could burst. If the glass shatters, there is a fire hazard to consider.
Replacing a vacuum tube is similar to the steps required to remove a malfunctioning capacitor. The key to a good repair is to ensure a solid connection.
A Final Though on Amps Wearing Out
All audio amps wear out some as time passes. It isn’t noticeable with daily use until significant repairs become necessary. When cracking, distortion, and popping occur, investigating the electronics to find the worn-out capacitors or vacuum tubes allows users to obtain parts to make the unit operational again.
I still use my Luxman R-117 receiver with almost any amp at home to teach my kids the family business of music. Something about its sound feels like a return to childhood for me.
Even when the kids are playing their songs and I’m encouraging proper technique, I can picture the evenings on my roof as a teen, writing music that most people wouldn’t hear. Those were some of the best times.
It’s always better to repair than replace whenever possible. If your amp sounds like it has lost some life, use the steps and tools in this guide to refresh that sound.