
Many people want to save their music to a computer to make it easier to access. Once you have a file from a CD or download, you can transfer it to numerous devices.
You can transfer vinyl, CDs, cassettes, and even 8-track tapes to a digital format with the correct reader for your computer or laptop.
What happens when you want to record a cassette tape? When the audio transfer process needs to go in the other direction, you’ll need to follow a series of steps to get the desired results.
How to Record a Cassette Tape
Recording a cassette tape requires a simple audio connection from one device to a tape deck. After loading a digital file or starting a CD, you need to press the RECORD button on the equipment. If you have a model that uses a stereo cable, you can run the file and the recorded tape simultaneously.
The easiest way to record a cassette tape is to have a battery-powered deck that operates independently of your phone, tablet, or computer.
You have two options available. It is possible to record on regular cassettes or microcassettes. The latter option is much smaller, but you’ll have more equipment options to consider. I prefer to use the Panasonic RR930 transcriber and recorder for that purpose.
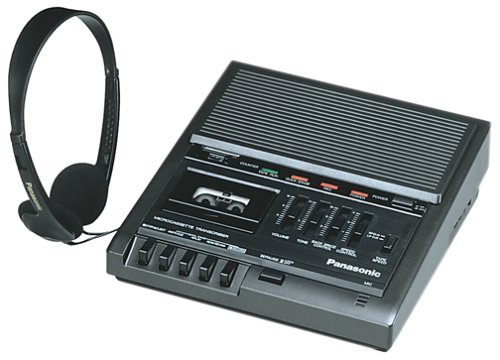
With the Panasonic microcassette recorder, you receive variable speed controls with a three-digit counter that makes it easier to know your place when working.
It uses a built-in condenser mic that transcribes accurate and authentic sounds while providing a headset and foot-controlled in the box.
It is portable enough to take with you almost anywhere while delivering the results you need for virtually any situation.
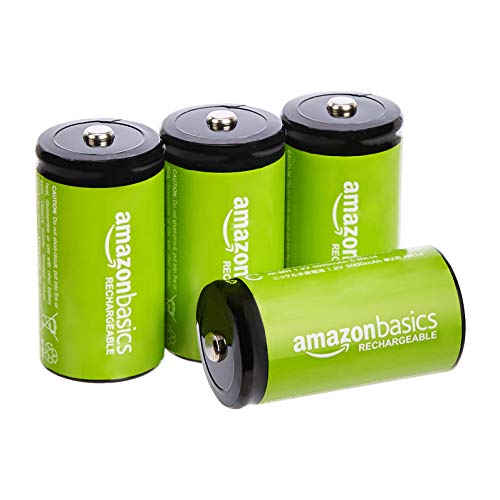
When you want to record regular cassettes, the Panasonic RQ2102 is a great choice to use instead. The portable design includes a carrying handle to make movement simplified while delivering the traditional one-touch recording that helps with this task.
The condenser microphone is remarkably sensitive, transcribing a depth of sound that’s unexpected when using this medium.

You’ll need four C batteries to work with this cassette recorder. I like to use the AmazonBasics 5000mAh option, keeping two sets at home so I can use one while the others get their juice back.
Once you have everything loaded to play, just press the record button on the tape deck while initiating the sounds.
When you’re finished, slowly release the button to prevent a clicking sound from entering the final recording.
How to Transfer Sounds from a Computer to a Cassette
If you have songs, podcasts, or other audio on a computer that you’d like to have transferred to cassette, these steps can help you get the job done.
You’ll need a Y-adapter to divide a single stereo output on the computer into two channels for a standard stereo cable.
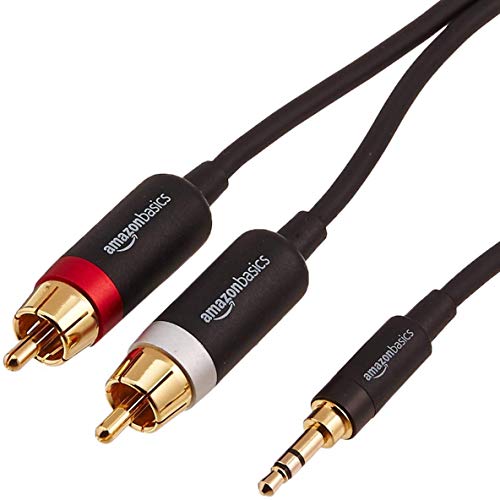
- Place the 1/8-inch plug from the Y-adapter into the line-out jack at the back of your computer.
- Connect the red and white plugs on one end of your stereo cable to the two jacks on the Y-adapter. The red one connects to the right jack.
- Connect the red and white plugs from the other end of the cable into the left and right recording jacks where indicated on the tape deck. You’ll still have the red one connecting to the right.
- Place a blank cassette into the tape deck. Rewind it to the beginning, if necessary, then press the recording button. You might be required to press record and play simultaneously on some models.
- Press the pause button immediately if it is present on your tape deck. Some models only need you to press the record button to start working.
- Adjust the sound level controls by turning the knob on the panel to the middle setting. Some models have other requirements that you’ll find in the owner’s manual to start this process.
- Open your preferred program that plays a music file. It’s usually Windows Media Player or iTunes, depending on the operating system you prefer.
- Play the music file on your computer while pressing and releasing the pause button simultaneously. If you don’t have a pause button, press the play and record buttons (if needed together) to begin the recording process.
- Monitor the sound levels on the recorder. Newer models use an LED display, but the older ones have a needle to track. You want the audio to stay in the middle range to avoid having distortions.
- When the audio file is finished, press the pause or stop button to preserve the room on the cassette. Queue up the next file,
What Causes a Cassette Tape to Screech Uncontrollably?
The primary reason why a cassette recorder starts squealing during operations involves dirt and grime. You’ll want to clean the heads to ensure the audio quality is what you want it to be when transferring sounds.
If you record while the tape deck squeals, those sounds will transfer to the audio recording on the cassette
These steps can help you ensure that the equipment runs as expected when you’re ready to record to a cassette tape.
Step #1: Open the Player
You’ll want to open the door to your tape recorder by pressing the eject button or its equivalent. It’s usually placed on the button row beside or underneath the mechanism, but it could be on the side, grip, or back of some microcassette units.
Step #2: Clean the Tapehead
Some small cotton swabs are useful to have for this step. You’ll want to dip them in rubbing alcohol, which is often listed as isopropyl alcohol.
Clean the head with the tip, making sure to rub vertically and horizontally to get the results you want.
Some tape recorders have the head extend outward when pressing play, which makes it a lot easier to clean the equipment.
When the cotton swab becomes dirty all over, replace it with another dipped in the rubbing alcohol.
Step #3: Repeat Until Clean
You’ll need to keep cleaning the cassette player heads with fresh cotton swabs until one comes back without any dirt or grime on it.
Step #4: Clean the Pins and Guides
After the heads are clean, you’ll need to follow the same procedure for the various pins and guides found on the deck.
Some components will be metal, while others are plastic. You’ll need to touch all the rollers and contact materials to ensure no additional screeching sounds occur.
Step #5: Wipe the Reels
You’re ready to wipe the reels with another cotton swap soaked in rubbing alcohol. You only need to do it once. After you’ve completed this step, you’re ready to play or record on the equipment.
Please note: cassette recorders and players installed in automobiles or sound systems may not be accessible when following these steps. You’ll need to purchase a specialized cleaning kit to take care of the work instead.

What Is the History of Cassette Players?
The first cassette tapes built for personal use were introduced in 1963 at the Berlin Radio Show. This technology came to the United States in 1964 under the name Norelco.
When the product was first introduced, the term “compact cassette” was a trademarked name.
That’s because cassette technology has been available since the 1930s in a reel-to-reel format. AEG was the first to release a recorder using this technology, calling it the Magnetophon. The initial production line was purchased by recording studios and radio stations.
Magnetic tape recording became popular after World War II, with Ampex beginning commercial production in the early 1950s. Because of their efforts, over one million homes were using this technology by 1954.
After four additional years of development, RCA introduced a quarter-inch reversible reel-to-reel cartridge.
It was insanely large, and only a few pre-recorded options were made available, which made it an unwieldy technology.
Although the product eventually failed, it would set the stage for the compact designs that were prominent in the music industry for over 30 years.
In countries like India, cassettes were still considered a low-cost way to release music to the public until 2009.
The last new car with an available cassette player was the 2010 Lexus SC 430. Sony stopped production of personal players the same year, and even the Oxford dictionary removed the term from some of its editions.
Although portable digital recorders are available, an analog tape is a desirable option for music production, listening enjoyment, and other needs.
You can find new releases in black and death metal using this format regularly, along with some in punk.
Sales of new cassettes have steadily increased since 2016. This technology is also an effective way to take notes, listen to lectures, or perform interviews.
What Are the Benefits of Cassette Tapes?
If you’re an artist and want to release music on cassette tapes, you’ll find that several potential benefits are possible. You can even play your mixes on a computer DAW to make your own tapes for distribution.
Here are the advantages you’ll want to review to see if this medium is right for you.
| Cassettes are cheap to create. | • Even if you run a low quantity line, you can make a cassette for a dollar or two. • That means you won’t need to spend thousands of dollars to produce an album. |
| It gives people a sense of nostalgia. | • As odd as it might sound, there’s a comforting feeling one gets when playing a cassette tape. • Even if you’ve transcribed a digital file to analog with a deck, you’ll find more value in the sounds because your brain connects the event with positive memories. |
| It is a small quantity product. | • You can afford to give away custom cassettes since the production costs are low. • Artists can create limited runs, step outside the typical processes of the music industry, or sell them directly at a profit. |
| The sound quality is comparable. | • When listening to cassettes, the sound quality from most players is equal to what you’ll get with high-quality vinyl. • If you’re used to compressed streaming files, it might sound better to transfer some songs to this medium. |
| You have customization options. | • Cassettes provide the ultimate DIY recording experience. • There are countless ways to customize the audio and presentation. • That means you can embrace your imagination without holding back. |
Is It Worth Recording on a Cassette Tape Today?
Although analog recordings are inferior to digital files, this audio format still plays a significant role in some industries. When you want to take music with you without using a file or download formatting requirement, recording a playlist to a cassette is an efficient way to explore new mediums.
When I was growing up, my parents always watched Star Trek reruns at night. It got to the point where if they weren’t watching the show, I struggled to fall asleep. I still have that problem today, decades later.
I vividly remember asking my folks for blank cassettes at Christmas to use in my tape recorder. When they bought me an eight-pack, I spent an entire day recording Star Trek episodes from the TV. If the commercial break would air, I’d hit the pause button.
Since I got 45-minute tapes, each episode could fit on a single cassette.
After filling the first eight in a week, my exasperated parents told me I had to stop recording the TV show.
Listening to the ones I had worked for a while on the nights when the show wasn’t on, but it soon got to the point where my thoughts were saying the lines while I heard them.
I didn’t want to tape over any of them. Eventually, I got my hands on a couple of additional packs of blank tapes. By the time I was finished, I’d collected the audio of about 60 episodes.
Today, I can just boot up Netflix on my tablet and fall asleep to several different Star Trek series. Even now, I sometimes think about those evenings listening to the recorded audio, imagining the worlds out there in the universe that might exist. When I felt alone, those characters made me feel like I was still important.
Knowing how to record a cassette tape can help you transfer audio from virtually any source. With the Panasonic RR930 transcriber and recorder or the Panasonic RQ2102, you’ll receive fantastic results!